
HOW TO MAKE
We don’t just sell starter cultures—we help people reclaim their gut health, one homemade jar at a time. Every spoonful you ferment is a small act of self-care, independence, and connection to natural traditions that nourish body and soul. In a world of shortcuts and artificial fixes, we stand for authenticity, genuine bacteria, and genuine results. Your health deserves better—and that starts in your kitchen


How to Make Yogurt

1
Please take 1L (1US liquid quart) of whole (full-fat) dairy milk with no preservatives.

2
Boil or heat the milk, then cool it down to 40-45 degrees Celsius (104- 113 degrees Fahrenheit). It should be slightly warm when you touch the sides of the container.

3
Add the starter and stir well. Leave for 15-30 min.
4
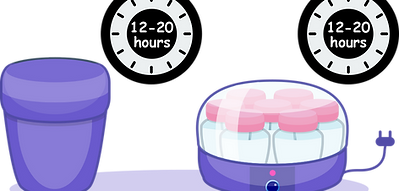
Transfer the mixture to sterilised jars of the yoghurt maker and incubate at 40-45 degrees Celsius (104F-113F) with no stirring or shaking for 12-16 hours or a bit more (occasionally 24 hours) if incubating the mix at a lower temperature or until set.
TIPS
The body temperature is 37℃, so when you put your hands on the sides of the container, you should feel it warm
You can use a flask with hot water, an electrical yoghurt maker, or just wrap the jar with thick towels and place it in a hot spot.
Regardless of the method you choose,
it is important to keep the temperature of the milk in the jar between 40°C – 45°C (104°F -113°F)
with no stirring or shaking for the time stated in the table below.
Once the yogurt is set (when the jar is tipped, the yogurt shouldn’t run up the side of the jar and should move away from the side of the jar as a single mass), take out 3 tablespoons from the mixture.
Do not add any flavouring before you have done this. You will use them for recultivation of a new batch of yogurt.

5
Refrigerate for about 3-6 hours.

6
Once the yogurt is ready, you can reculture again with 3 spoons of ready yogurt and milk, and this time incubate for about 3-6 hours, so keep an eye on it.
Once the first batch of yogurt is ready, place it in the fridge. In this way, you will have activated yogurt for the next few weeks. Just take a spoon or two and add warm milk. Mix well and incubate at 40°C - 45°C (104°F -113°F) for 3-6 hours, and voilà – the new batch of yogurt is ready. You can also freeze some in a sealed container, so you can keep activated yoghurt for months.
One step left - take out the yogurt from the fridge after 3 - 6 hours and Bon Appétit!
How to Make Kefir
1
Please take 1L (1US liquid quart) of whole (full-fat) dairy milk with no preservatives.

2
Boil or heat the milk, then cool it down to 40-45 degrees Celsius (104- 113 degrees Fahrenheit). It should be slightly warm when you touch the sides of the container.

3
Add the starter and stir well. Leave for 15-30 min.
4
Transfer the mixture in sterilised jars and incubate
4.1 Method 1: Using a heating device
Using a yoghurt maker at 40-45 degrees Celsius (104F-113F) with no stirring or shaking for 12-16 hours or a bit more (occasionally 24 hours), incubating the mix at a lower temperature or until set. The kefir set with a yoghurt maker will have a yoghurt-like texture with specific flavour and taste.
4.2 Method 2: Room Temperature
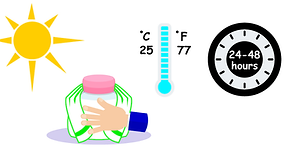
Room Temperature Incubation – wrap the container with a thick towel and place at hot spot for 24-48 hours (occasionally a bit more) if the temperature is lower than needed. The kefir set at room temperature will be liquid with a specific flavour and taste.

5
Refrigerate for about 3-6 hours.

TIPS
Using a microwave is OK for boiling.
Cover the container with a thick towel if the temperature in the house is less than 25°C(75°F) and place it in a hot place.
In order to keep temperature of the mixture above 22°C-25°C (70°F - 80°F) you can use flask with hot water
The body temperature is 37℃, so when you put your hands on the sides of the container, you should feel it like lukewarm
Then shake the kefir vigorously, place a lid on the container, and store it in the refrigerator.
Do not refrigerate or add any flavouring before you have done this. The remaining Kefir is ready for consumption.

After a few re-cultivations with ready kefir and milk, you should start noticing small grains. You can separate them at this stage and use them as a starter. The grains will gradually increase in size and number and will become your own :)

Kefir grains from a freeze-dried starter
6
Once the kefir is ready, you can reculture again with 3 spoons of ready kefir and milk, but this time incubate for about 3-6 hours, so keep an eye on it.
RECULTIVATION or BACK SLOPPING
Now you can prepare the next batch of Kefir using the 3 tablespoons of Kefir you took from the previous step. Add a litre of milk, stir well and leave it at room temperature for 24 hours.
Please note that all further batches from this original sachet only need 24 hours to culture or less if you use a heating device. For each fresh batch, remove 3 tablespoons as above and repeat the process. After 4 to 5 weeks, when the Kefir is beginning to get thin and watery, use a new packet of Kefir and restart the cycle. Prepared Kefir should be stored in the refrigerator and consumed within 48 hours.
Choose a safe spot. An ideal culturing place should be relatively warm but not excessively so. Temperatures between 20° and 29°C (70°F - 85°F)are ideal. The best fermenting spot for kefir is out of direct sunlight. Indirect light or darkness is neither favourable nor problematic. Be sure the kefir is not fermenting near any other cultured foods such as kombucha, yogurt, sourdough, sauerkraut, etc. Do not culture your kefir near a garbage can. Cross-contamination of stray yeasts and bacteria can be problematic for the kefir and any other fermented foods you are working with.
Signs the Kefir is Done Culturing
Cow or Goat Milk: The culturing process is complete when the milk thickens to the consistency of commercial cultured buttermilk. It will be a pourable liquid and not an “eat with a spoon” level of thickness, although if it is fermenting longer will become thick. If you prefer it pourable, please shake it well before putting it in the fridge. The milk will also take on a distinctive sour fragrance.
Coconut Milk: The coconut milk takes on a distinctive sour, less sweet fragrance. Cultured coconut milk does not thicken reliably like dairy milk.
Coconut Water or Juice. The coconut water or fruit juice becomes cloudy and less sweet.
Yogurt & Kefir with Alternative Milks
Milk Considerations
Yogurt is a dairy product. The lactobacteria multiply and flourish in a dairy milk environment because dairy milk contains all the elements they need; also, the chemical structure of the dairy milk determines the biotechnological processes and conversion of the milk in yogurt. Dairy milk contains milk sugar " lactose " and a specific protein called " casein. These two determine the texture of the end product.
On the other hand, most of the milk alternatives are actually plant juices, such as coconut milk, or water-based extracts of a particular source, like almonds, soybeans, rice, etc.
Although, for example, soy milk is very close to cow's milk, as they both contain a similar amount of protein and sugars - the sugar is a different type and is called ''Sucrose'' and basically is ''table sugar''. These small differences in quantity and type of sugars, as well as vegetable origin, reflect significantly on the end product and approaches when you have to make yogurt from alternatives to dairy milk. The end product might not look like dairy yogurt. However, the bacteria will be present inside, as well as healthy benefits.
Before starting to start making yogurt with dairy milk alternatives, please consider.
1. Origin of the plant milk which you will use. Please make sure that there are no preservatives inside, or they will kill the bacteria in the starter (please remember that the kefir and yogurt starters contain live bacteria). The best plant milk is that you can make on your own at home. Most of the ''shop ones'' contain some preservatives in order to extend the shelf life.
2. Please do not boil the plant milk; this will ultimately change its structure, but please pour boiling water over containers and equipment which you will use, to remove other bacteria which can get in competition with the yogurt or kefir ones for food. Please do not use cold plant milk - the temperature of the milk should be lukewarm.
3. Please add a small amount of sugar in order to provide bacteria with food. Please do not forget that bacteria eat sugars - the milk is just a medium which provides them with food. Please also do not add too much sugar, because after some point the sugar can act as a preservative - so the balance here is essential - 1 teaspoon per litre should be OK.
4. Activation(first batch made with freeze-dried culture) and alternative milk should be very carefully considered. The bacteria in the freeze-dried starter are in a state of hibernation, so they are fragile at this stage and sensitive to the medium. A small difference in the quality of milk or temperature, and they will die. The alternative kinds of milk are not the perfect medium for lactobacteria, so the result will be unpredictable. Please activate freeze-dried starter with traditional dairy milk and then use 2-3 spoons to re-culture batch with alternative milk.
5. Yogurt/Kefir made with alternative milk will not be able to re-culture successfully, with small exceptions such as that made with soy milk.
6. Once your yogurt/kefir has completed setting up, is possible to be divided into curds and whey. This is normal for yogurt/kefir made with alternative milk. Please place it in the refrigerator to thicken up, and after a few hours remove the liquid using cheesecloth.
However, some people with severe lactose intolerance might be sensitive even to those 2-3 spoons of yogurt/kefir made with dairy milk, which is used as a starter for a new batch of alternative milk, even though they are greatly diluted in the alternative milk, and the lactose has been broken down to simple sugars.
For all those people, please follow the steps here strictly
How to make Soy Milk
Making Yogurt & Kefir with Dairy Alternatives
How to make substitute of yogurt with alternative milk in an authentic way.

1
Please make your alternative, plant-extracted substitute for dairy milk at home or find a pure substitute for dairy milk with no preservatives or additives and the highest fat content.

2
Gently heat (Do not boil) and gently stir 1 L of Pure (homemade, unprocessed) milk on the stove (not a microwave) to lukewarm. Do not overheat plant-based milk.
2.1
Add half a teaspoon of sugar or honey to the milk and stir again.

3
Open the capsule and add the contents in small amount of the milk, then stir well. Mix with the rest of the alternative milk.

4
Transfer your cultured sweetened alternative milk to your yogurt maker. Incubate it for 24 hours at rest. If the culturing process works, you should, after 12-24 hours, have a thickened layer - curds- sitting on top of some liquid(whey). The amount of the liquid depends on the fat content or the lack of it. Higher fat content will result in less liquid. Also depends on the amount of water in the alternative milk. As they are mostly kinds of juices, the water content is high.

5
Without stirring/shaking, transfer your substitute for yogurt to the fridge. Leave it for at least 3 hours.
